6 Ways to share surveys
Building a survey is merely the first step of the entire research process. The next step is to start collecting answers. An obvious question pops into one’s mind: How do I get my survey amongst people, that is to my respondents? In this step, Survio can give you a helping hand, that is through various ways of distributing your surveys. In this article, we will sum up 6 ways how to easily and quickly share surveys with Survio.
- Sending a survey link via email
- Email invitations in bulk with respondent identification
- Sharing a survey link on social media
- Embedding the survey directly into your own website
- Using QR code in business premises
- Distributing surveys in paper form
1. Sending a survey link via email
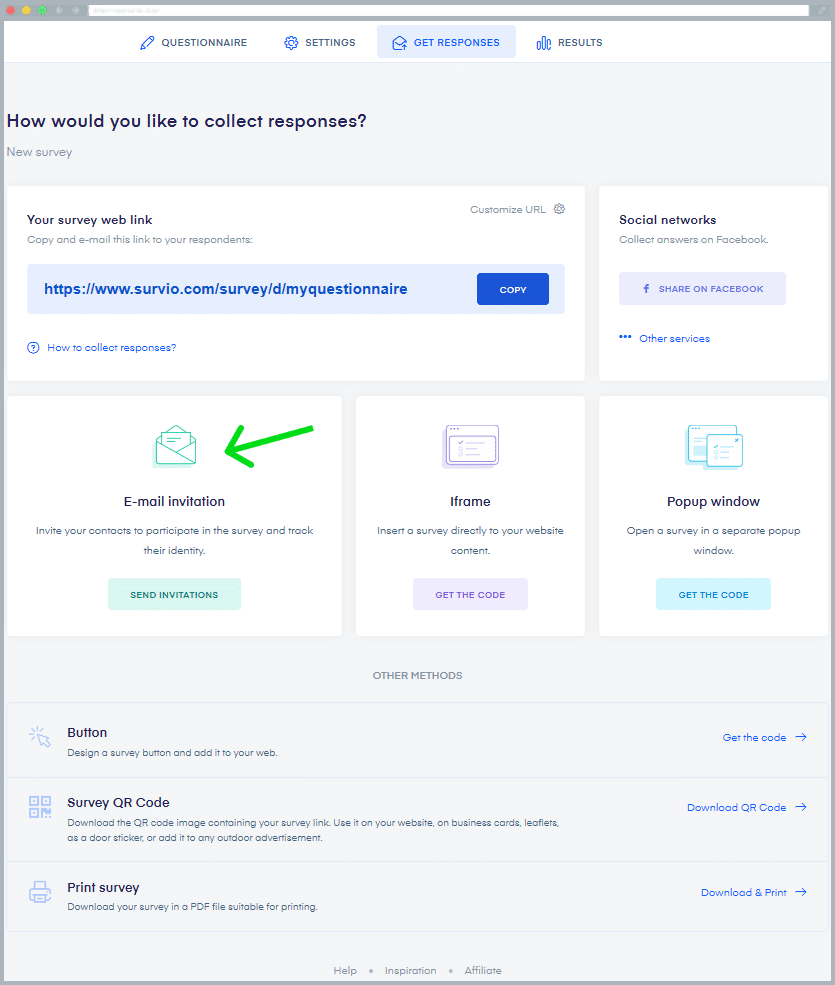
As soon as your survey is ready, you need to get it to your respondents. The first option available is, obviously, sending a link to it via your email. The way it’s done is very simple. Open the survey you wish to share and click at the Get Responses tab in the top menu.

Here’s where you find the link that you just copy and paste to your email. After that, simply just send the email and wait for the responses.
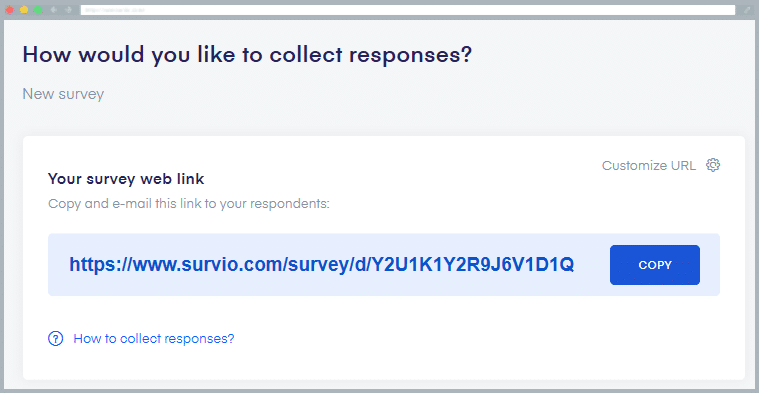
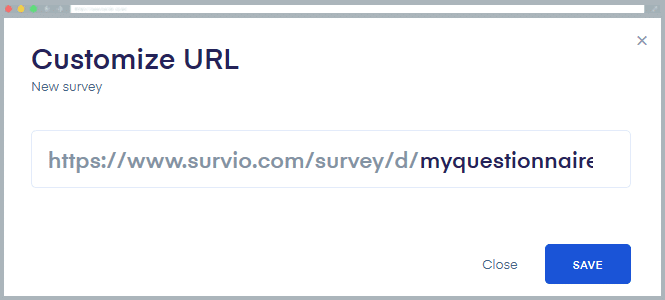
Tip: If you find the link to the questionnaire too complex to remember or in case you would like to customize it to your liking, you can change it and use your own text, which you can save in one click and copy to your email invitation again.
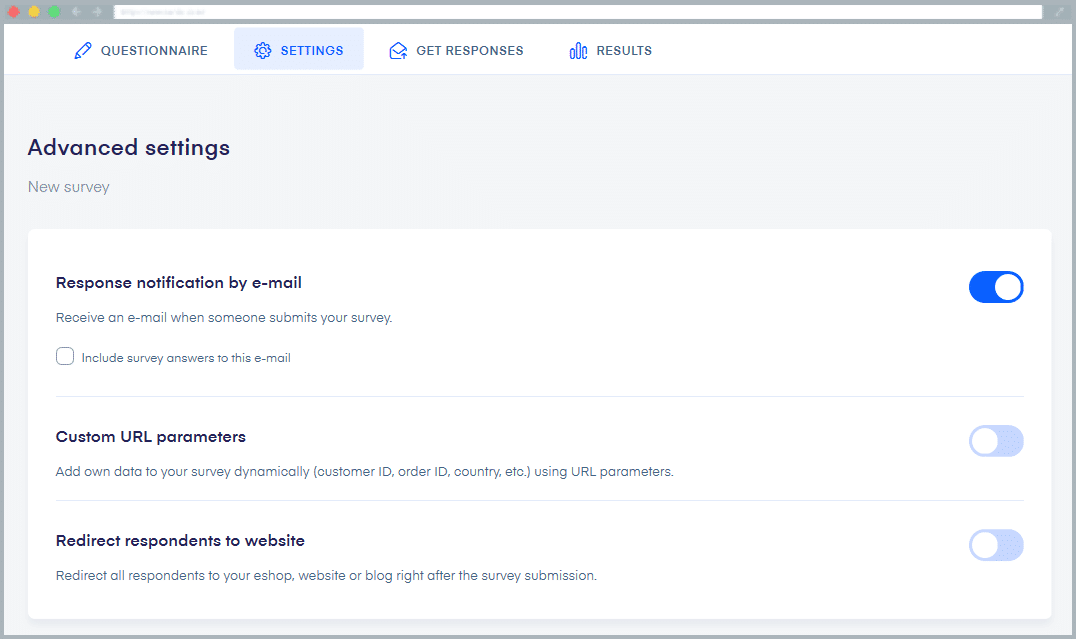
Setting up notifications
If you want to find out about new answers to your survey, turn on email notifications. Just be careful, if you are preparing a really big survey, e.g. for 1000 respondents, you will receive notifications for each and every single answer. Therefore, use it in justified cases only, such as when you need to respond to your respondent’s comments or registration (in case you use Survio for registration forms).
An alternative to the classic email invitation is to use an email newsletter that includes a link to your survey. Your newsletter recipients, i.e. your customers, can provide you with lots of important information. In the newsletter, you can also motivate them to fill in the questionnaire, using many benefits. Find inspiration in our article: 9 Tips for how to use you survey’s Thank You Page.
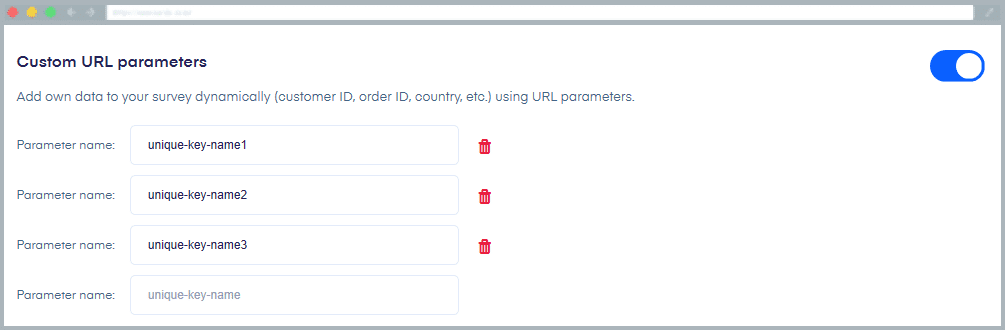
At the same time, you can use various other extensions that are available in the settings. For instance a custom url parameter (get parameter), which will insert additional values that you define into the survey. Thanks to those, you’ll be able to identify a specific order or a certain customer. You can set as many of the variables as you like.
This Survio extension can be activated in the questionnaire settings. Choose Custom URL parameters. Then just name these parameters. You will then see the same names in the results of each survey.
All these parameters are saved in the survey along with each respondent’s answers. You can assign values to individual parameters manually, but it is of course much more efficient to use a tool to do this. Usually, it can be simply done by your newsletter or CRM system.
If you wish to send out as many invitations as possible, you should be aware of the possible limitations of your email service. Sending large amounts of emails might overwhelm servers or even block your mailbox (see notice). Don’t worry, Survio has a very effective solution for that.
Warning
If you send a really large number of e-mails (i.e. hundreds of emails at a time), you will encounter limits of email inboxes. For example, gmail allows you to send a maximum of 500 emails a day, messages above this limit are not sent. If you use an email client (e.g. Outlook or Thunderbird), their limit could be even lower, e.g. 100 emails. At the same time, your email may be considered spam, and in the worst case scenario, your email inbox can get blocked. That is why Survio provides its users with an email invitation service that completely eliminates this risk, has no limits and brings many other benefits. Read on and find out more!
2. Email invitations in bulk with respondent identification
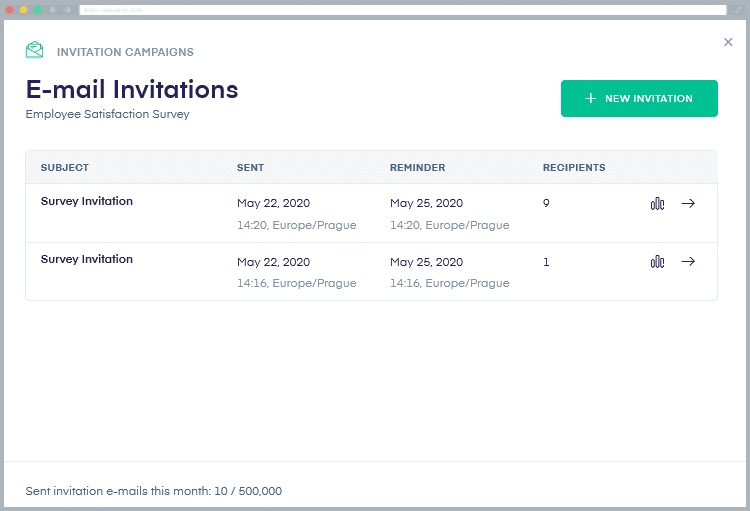
Do you need to collect answers from a large number of people, e.g. your customers? Is there an abundance of them, or do you need to stay up to date with who has completed your survey and who hasn’t? Then opt for the Survio email invitation service, into which you just copy and paste your email contacts and invitations will get sent out in no time. There are absolutely no limits, you can easily send thousands of invitations at once. It is very easy to use, and sending invitations in its intuitive interface is a matter of just a few clicks. At the same time, not only the distribution but even the delivery to the respondent’s inbox is guaranteed.
In addition, you get a huge advantage compared to the classic emails as you will know who’s opened your survey and who’s completed it. This gives you control over the collected answers from your respondents. Of course, the contact email address will be automatically entered into the questionnaire and you will know exactly who filled it in. More details coming in a moment.
Read about the exact procedure of how to prepare and use the email invitation service in a separate article – How to prepare survey invitations directly in Survio. However, let’s cover at least the basic principles of how the email invitation service works. Of course, the first thing you need is a created questionnaire and a list of emails to which invitations will be sent. In the survey you want to share, click on Get Responses in the top menu. Then, choose E-mail invitation. Copy your email contacts, send out your invitation and just wait for the answers.
And how do you find out how successful your email invitations were? Take a look at the overview to see important information about the success rate of individual invitations. Open the invitation window (click Send invitations button) to see an overview of all invitations you have sent so far. For each of them, you can see its details and well-arranged indicators of its success.
Success indicators
Under the diagram icon, you’ll find an overview of individual indicators of your invitations’ success.
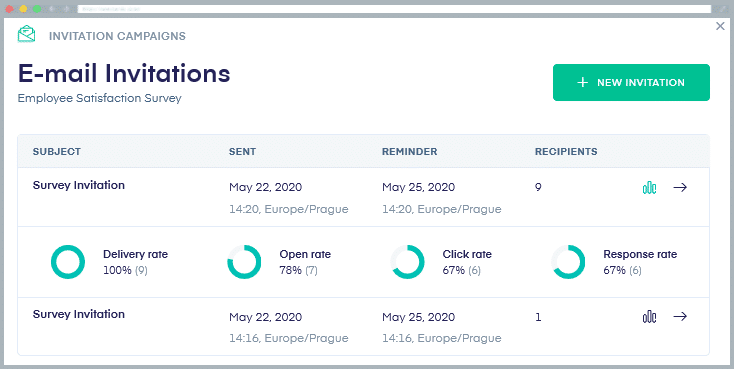
The first value of the delivery rate shows the success rate of the invitation delivery, i.e. what proportion of respondents was the invitation delivered to. The opening rate value shows the proportion of invitations that were viewed by their recipients, i.e. how many people have opened your invitation in their email inbox.
However, the most important values are the click-through rate and the fill-in rate. The click-through rate tells you how many respondents have opened the questionnaire, and the fill-in rate shows how many people have successfully completed filling in the questionnaire. In addition to the relative percentage, you can also see the results in exact numbers. This way, you get a perfect overview of the number of completed questionnaires.
Detail of the invitation campaign
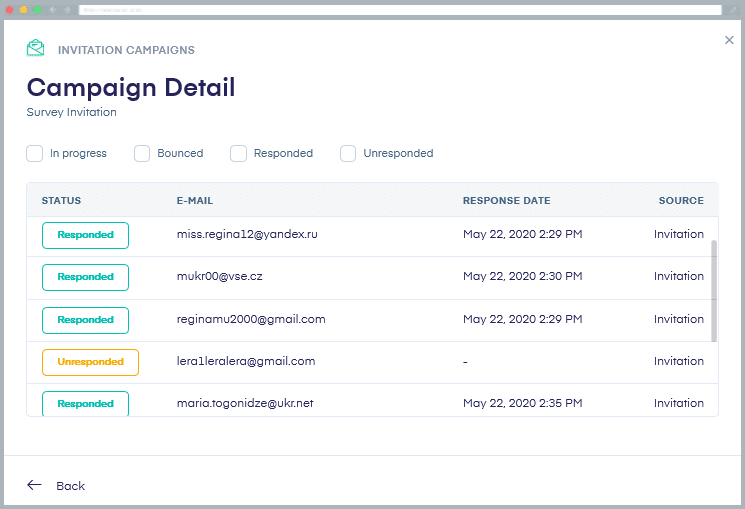
Let’s get back to the overview of the individual invitations and click the Detail button.

In the overview, you will see all the invitations that were sent to individual email addresses, and at the same time you can see for each row whether the questionnaire was filled in by the respondent. This gives you an overview of how effective the invitation was. You can continue to work with the information, filter it by checking individual options, or download the data and work with it on your computer.
You can see for yourself that it’s very easy and effective to use the email invitation service. You can definitely not reach the same level of efficiency by merely using your email.
Note
The email invitation service is a Premium feature in Business and Elite accounts and we can guarantee that it’s worth it.
Nowadays, if you don’t have a profile on Facebook, Twitter or other social media, it is as if you don’t exist. We at Survio will certainly not force anyone to create one. We would however strongly advise you to use your contacts to get more survey responses. The way to let your friends know about your survey is really simple.
You can either share the link to your questionnaire to your profile by yourself, or there is an even simpler method to use. All you have to do is click one of the social media icons in the Get Responses menu and you will immediately get to Facebook, for instance, where you just need to confirm the sharing. You can also choose where you want to share the link, e.g. in different groups that you have access to.

If you want to get more specific groups of respondents, try to find groups on social media that focus on the topic of your questionnaire and ask the members of these groups to fill it in, because their opinion is valuable for you.
Another option, which is very similar to social media sharing, is to share a link to your survey on discussion forums. Again, you can choose amongst those connected to your topic. You can find a number of discussions focused on very specific tipics on the Internet and their members might therefore be all the more willing to fill in the questionnaire if it concerns their problems and topics.
This way, you can get many relevant responses very quickly and easily.
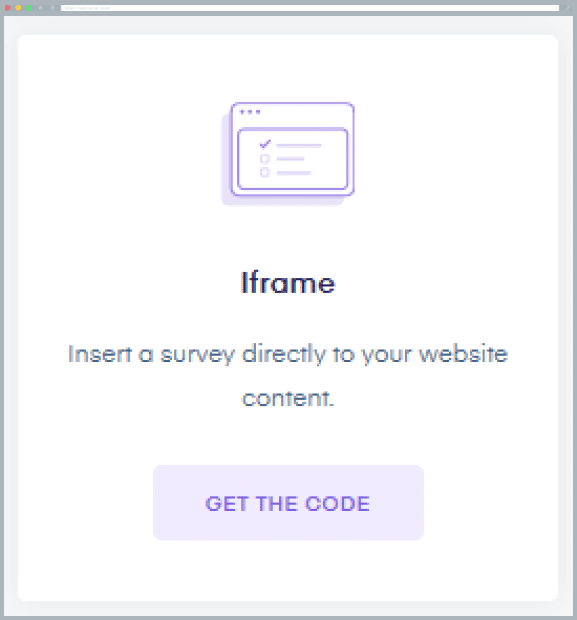
4. Embedding the survey directly into your own website’s content
Survio users very often use the option of embedding a link to a questionnaire to their website. However, you can easily embed the entire questionnaire into your website. There are several motives for doing this. If the questionnaire is embedded in your website, your respondents may not even know that you are using a service to run the research and the questionnaire looks like a standard part of the site. This may make your respondents more interested in completing the survey. Of course, it also looks very professional. The ideal combination is to embed a questionnaire with your own organization logo uploaded in it as well as with a customized survey footer and thank you page. The setup is very simply done through the Get Responses menu under Iframe (Insert a survey to your web).
There are three options to choose from. Embed a button, embed the entire questionnaire into the website using an Iframe, or using a pop-up window.
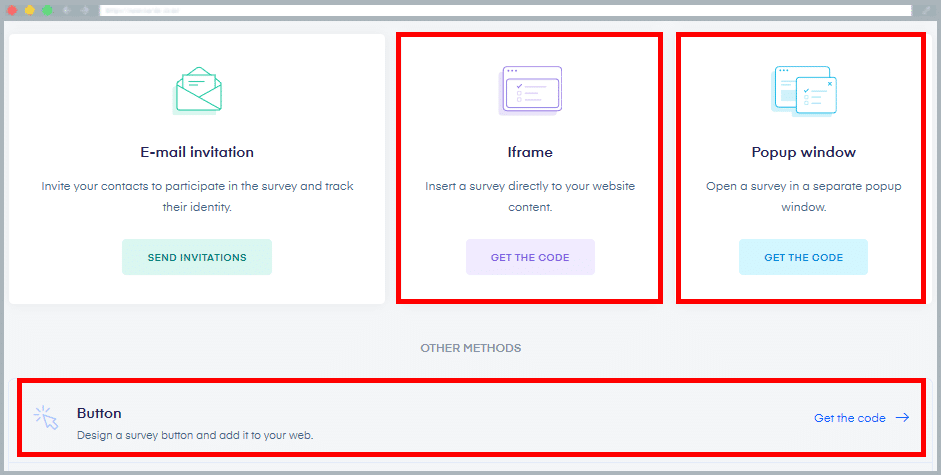
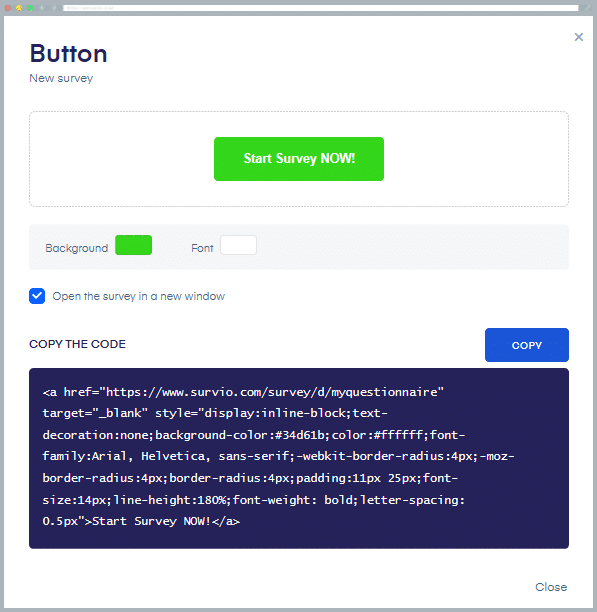
Let’s take a look at the individual options. The first one is only inserting a button that you place in your website’s content. After clicking the button, the respondent will get redirected to the questionnaire and fills in their answers. At the end of the questionnaire, the respondent can get back to your website again, e.g. to a page containing a reward for filling it in (read more in our article 9 Tips for how to use you survey’s Thank You Page).
You can customize the button to suit your needs. In the advanced settings, you can adjust the font type, size and other parameters.
Once you’re happy with the settings, just copy and paste the code into a convenient place on your webpage.
Survey as a part of your website
Another option, and most used one, is to embed the entire questionnaire into your own webpage through Iframe. The questionnaire then looks like a part of your website. You can easily adjust the size of the frame. Just copy the code and, as in the previous case, paste it into your page. It is up to you whether the questionnaire gets to be placed under some text or on an individual page.
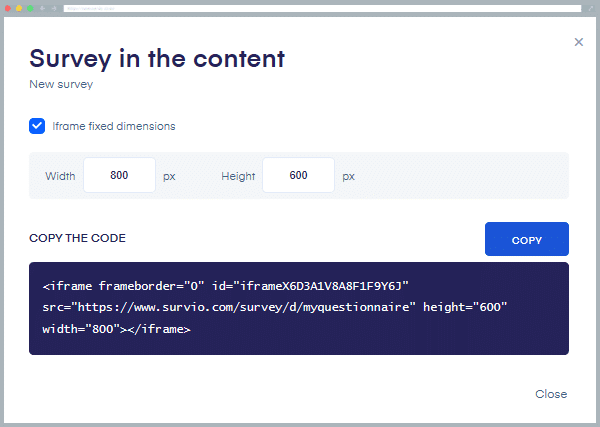
An example of an embedded questionnaire. It’s functioning, try it and fill in your answers.
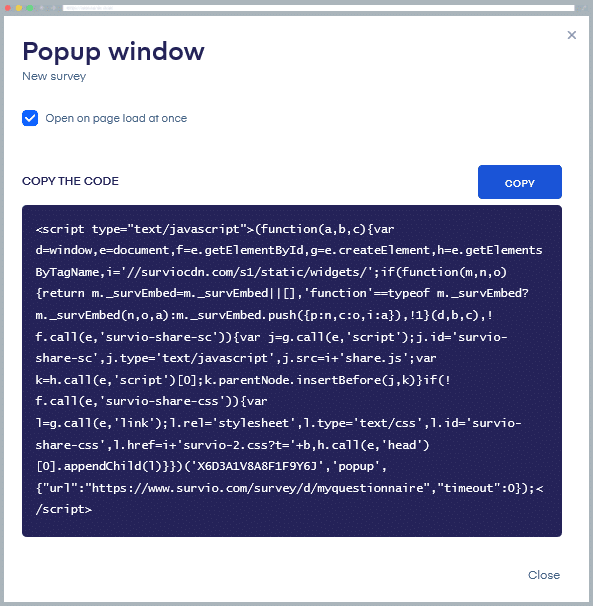
Survey in a pop-up window
The third and last option is to insert the questionnaire into a separate pop-up window. In this case, the questionnaire simply opens up automatically in an individual pop-up window. The window either opens as soon as the page loads, or you can set a delay. Again, just copy the code and paste it into your webpage.
Note
If you don’t have much experience with editing your website’s content, ask an IT specialist to insert these codes into your website for you. Incorrect code insertion can cause the questionnaire to malfunction or its incorrect display. Do not forget to always check the correct functionality of your survey after inserting the code into your website!
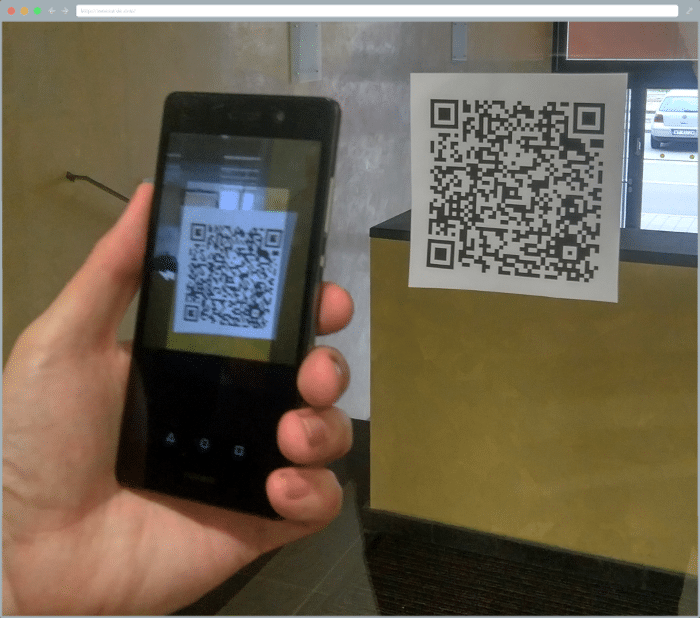
5. Using QR-code to distribute a survey
Passing a link to an online questionnaire to your respondent in store or other business premisses can be quite a problem. But what if you tried combining an onlinesurvey, a mobile phone connected to your wifi and a QR-code? It’s enough to print the QR with a link to the questionnaire and place it in a suitable place in the store or, for example in the staff dining room. Respondents can then connect to your wifi with their mobile phone and fill in the questionnaire immediately, e.g. while waiting.
You can download your QR-code in Get Responses.

And because Survio can even be used for registration forms, your future client can fill it in quickly in the waiting room, while they wait for their turn. There’s a myriad of possible uses.
6. Distributing surveys in paper form
Primarily, Survio is an online platform, but of course it also offers the possibility to download the questionnaire in pdf and then print it. This is particularly useful when it is difficult to reach people who do not have access to the Internet or when you need to run a field research.
Simply, just prepare the questionnaire in Survio, print it out and then use it according as you need. You can download the questionnaire in the Get Responses tab by clicking the Download & Print button. You will get a printable questionnaire in pdf format.

You can approach a respondent on the street, in your business premisses, or send him the questionnaire by post. There are countless options. Once the questionnaires are completed and collected from the respondents, you should start thinking about how to process the responses and transfer them to your computer for a further analysis of the answers. There are several options.
Manually calculate individual answers
When processing a survey, the only thing researchers can often think of is to just count appearance of each answer and that’s it. However, this way, they not only lose the possibility of comparing individual questionnaires and answers with one another, they also lose the possibility of using traditional statistical evaluation. Simply put, this method can be compared to writing down commas on a piece of paper and counting them. Don’t do it.
Use of spreadsheet programs
Some researchers try to use different programs when transcribing paper questionnaires into electronic form. Spreadsheets (e.g. Excel) are used very often. But typically, the problem occurs in the way the data is recorded. When it comes to how to record data, people are usually confused and do not know how the data is supposed to be organized.
The main rule in this case is to use individual rows for individual questionnaires and columns for individual questions in the questionnaire. You’d be surprised how often people do the exact opposite.
Another question is how to record different types of questions. For instance, try to think about the best way to record results of an alternative question, that is one in which your respondents can choose more than one answer. (see more in the article How to use closed questions correctly). See an example of such question in the picture.
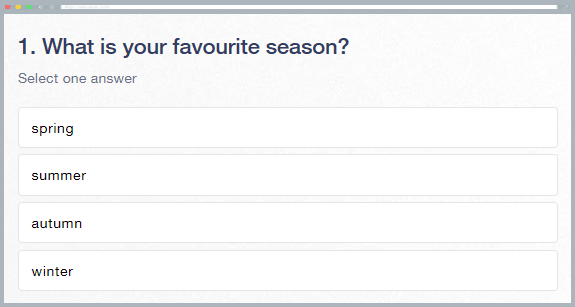
As you can see the question has 4 possible answers. How many columns will you need in the chart and what values shall you record in there? Let’s take a moment to think. If you’re thinking – one question, one column, then you made the incorrect choice. The right approach is to create a separate column for each response. And what do you enter in each column? Yes, you will write values of 0 or 1, or other values that will clearly indicate the selected answer.
Now, try to think about matrix or ordering questions, it gets even more complicated. Don’t try to solve it on your own, just use Survio.
Do you find these options too complicated? We agree. The solution is very simple. There’s no need to know how to design the correct data transcription to your computer. The simplest solution is clear as you already have an online survey in Survio anyway.
You can easily rewrite the data into electronic form just like your respondent would do in case they’d be filling in your survey online. After entering all the questionnaires, you will have all the survey data converted to digital form and then, you will be able to download the data to your computer.
Although, after all, why should you do it by yourself if you have the option that Survio does the analysis for you? You can just download the final results in a well-arranged report with charts and diagrams, in which you merely write your own notes if needed.
See examples of how the exported data look:
Conclusion
You have just read about the different options for distributing your survey. See how simple it is? If you take advantage of all these options, you will definitely collect lots of valuable answers. Try it out!
Create your own questionnaire or survey for free
Setting up your first survey is quick and straight forward. Choose from one of 100 predefined templates or create your own from the scratch. Start getting your first responses in 5 minutes.
Create your own survey