How to prepare survey invitations directly in Survio
Have you finished creating your survey thinking the job is done? Not at all! Your effort and energy would get wasted if it stayed saved on your computer. It’s about time to spread it out there and share it with your future respondents! There is, of course, an entire list of ways to do so. Today, we’ll focus on how to do it by using Survio’s distribution service. Other ways to distribute your survey are described in the article 6 Ways to spread your survey amongst people.
But before we start seeing you through the process step by step, let’s explain why using our distribution service is even worthwhile. It’s simple – it’s an outstandingly effective solution that will give you the upper hand. Let’s say you decide to distribute your survey from your e-mail. You will then for sure stumble on a whole lot of complications. Not only are there limits for daily amounts of outgoing emails – for instance, if you’re using Gmail, it’s 500 emails per day, for some offline email clients like Outlook it’s even less than that, about 100. To avoid that, our distribution service really comes in handy. Through Survio, you can send out as many invitations as you wish, no limits applied.
Another fundamental benefit is that with our distribution services, you will always stay posted about how many people have received your survey, who has opened the survey or even completed the survey. Other services are typically not able to provide this kind of information. You will simply gain full control over the entire process of realizing your survey.
Survio’s distribution service is also very useful when you need to reach out to a specific group of people from your contact list. A typical example here is contacting all of company’s employees who are supposed to fill out an employee satisfaction survey. The results could again be monitored easily by using our distribution service.
Now, let’s talk about how the distribution service should be set up and used.
How to set up an invitation?
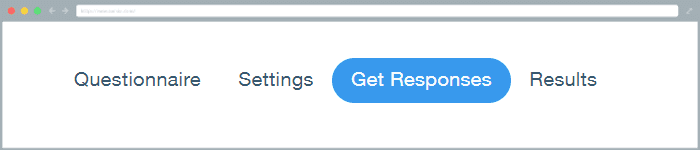
As soon as you’re done building your survey, click on the Get Responses link in the top menu.
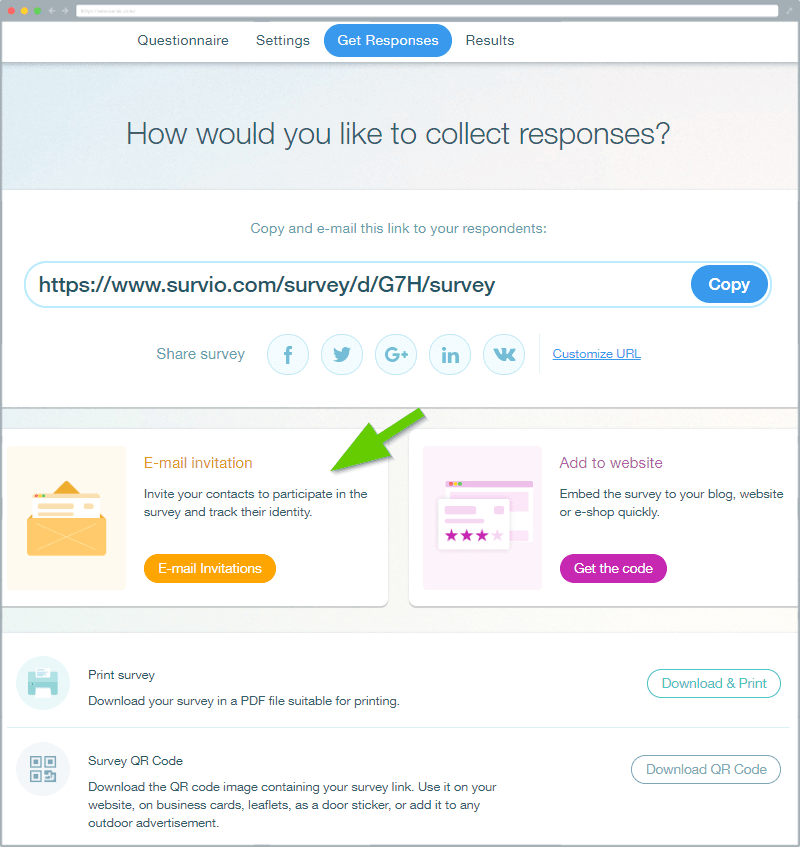
You will see a list of options you can choose from when distributing the link to your survey. Choose E-mail invitations.
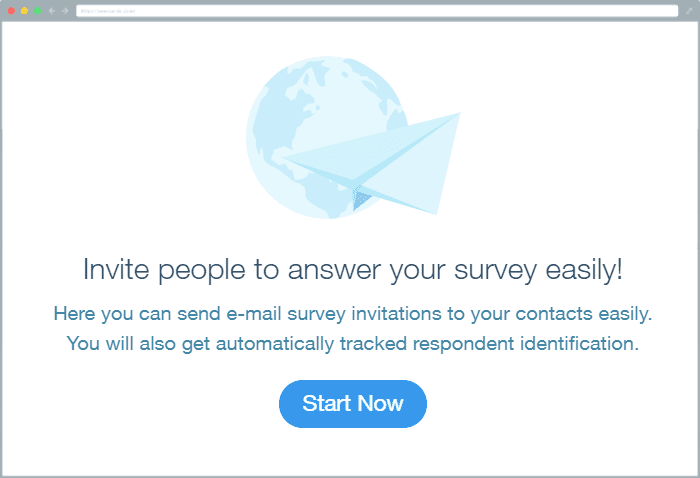
 Information about how the invitations can be used will pop up. Click on Start Now.
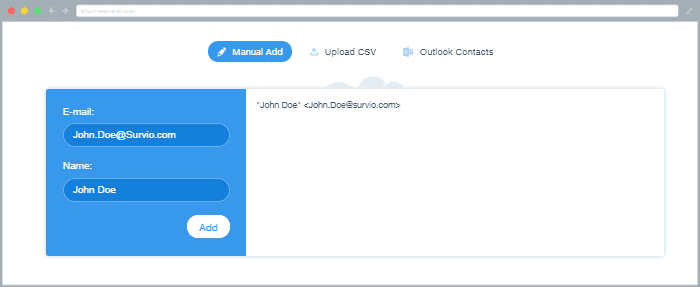
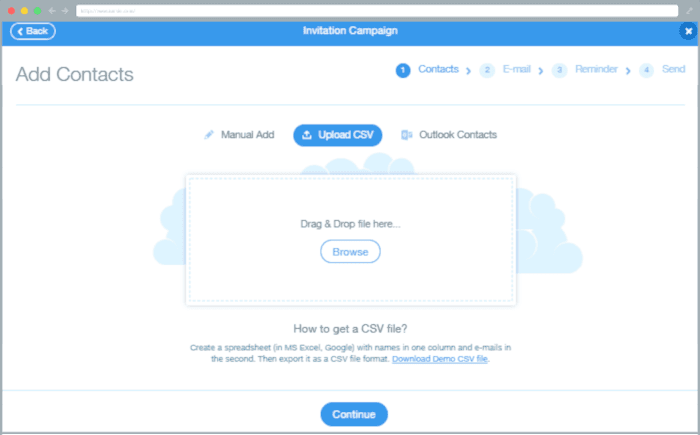
Three ways of uploading your contacts to a list for distributing of invitations
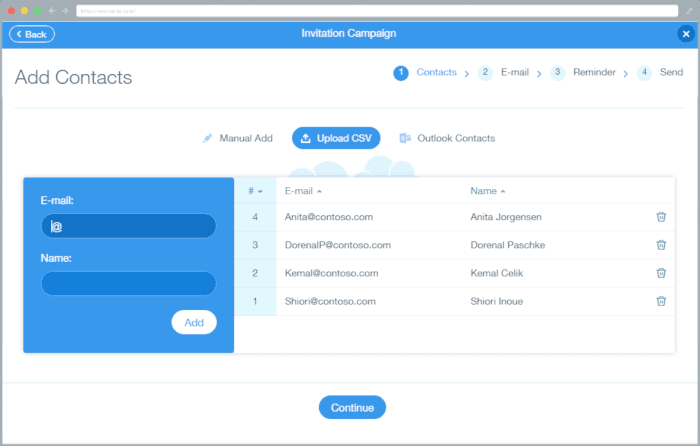
Now, you can be adding individual e-mail addresses and create a list of contacts that will receive your invitations to fill out your survey. You can choose from three options to do so. Firstly, you can add them one by one, manually. Secondly, you can upload a CSV file containing these contacts. Finally, you can upload contacts from your Outlook e-mail client. Keep reading to find out more about each option.
Adding contacts manually or by using a simple copy-paste method
If you decide to add your contacts manually, this is the way to do it. On the left side, you fill in the “E-mail” and “Name” fields with the actual data and confirm by clicking on the “Add” button. The contact will get saved and displayed on the right side right away. It is of course most important to fill in the e-mail address but if you manage to take the time and fill in the name as well, it’ll be of a significant help for you later when reviewing statistics of your invitations. It’ll make it all a bit easier on the eye.
The other option is to type the contacts directly to the right field or copy and paste them, from an Excel spreadsheet for example. If you copy and paste it directly from a spreadsheet, make sure to only use the column with e-mail addresses. To make the list more organized, you can even add the names. It is however very important to structure the data as follows:
“Name Surname” <example@email.com>
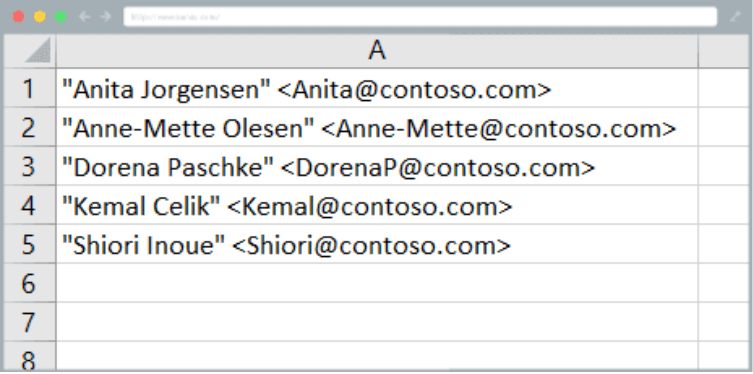
Each contact needs to be just one string per cell otherwise the contact won’t be transferred correctly.
As soon as all your contacts are filled in, click on the “Continue” button.
Using a CSV file with contacts
Another solution is uploading a CSV file. It is a universal data format that could easily be created in various programs, MS Excel included. It is possible to generate it in pretty much any database or statistical program. Its data needs to have an exact form, like the one you will find in this example of a CSV file. Don’t forget that the file’s first line has to be in the following format (which should not be changed or modified), heading included:
Name;E-mail
Peter Johnson; peter.johnson@survio.com
Anne Albright; a.albright@survio.com
The same rule applies again – one line, one contact. If you want your contacts to contain both first name and surname you need to separate them from the e-mail address by a semicolon. If you don’t want the name to be included, no need to include the semicolon, just copy and paste the column with the email, without the heading. However, if the e-mail addresses are all you wish to input, simply use ctrl+c, ctrl+v.
After you’ve uploaded the CSV file, you will see all the imported contacts, now in Survio’s system. If you find out later that some of the contacts won’t be used, you can simply remove them from the list by clicking at the bin icon next to the contact.
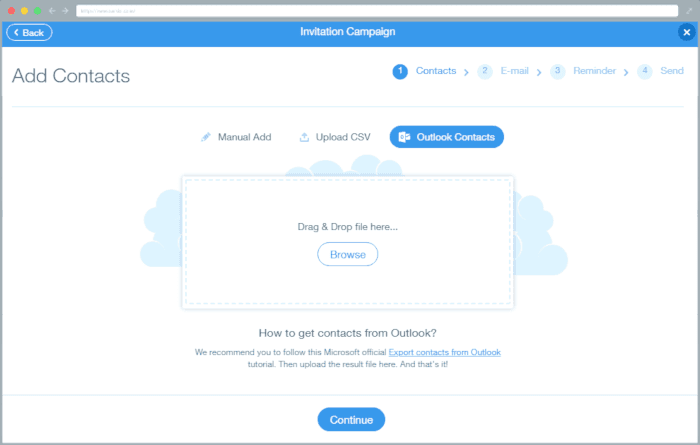
Import contacts from Outlook
The third alternative for uploading your contacts is by using a file that you download from your Outlook. You can find more information about how to export the contacts on Outlook’s official helpdesk. Technically, it’s the same procedure as when uploading the CSV file. Don’t make any changes in the file exported from Outlook, Survio will find all the needed information in it automatically – name and e-mail.
When you’re done, click the “Continue” button.
Text in the invitation
The next step leads to the very invitation that will be sent to the provided contacts via e-mail. The invitation can be edited as you wish. It is even possible to create a fully original invitation. The only thing that needs to be preserved is the “Start Survey” button because it leads to your survey. Although even its text and color can be adjusted.
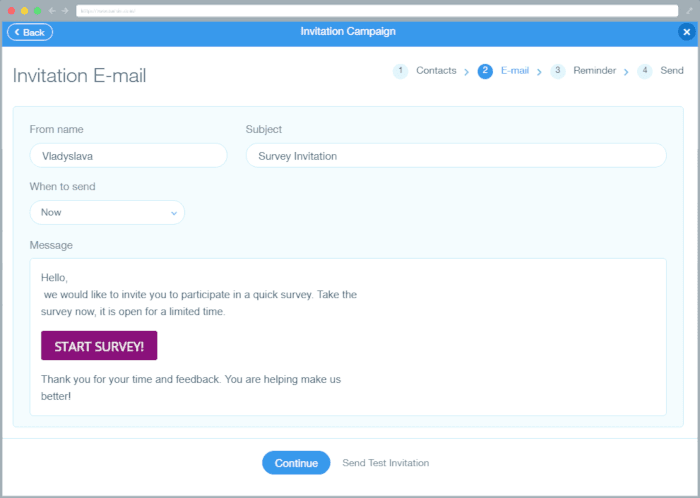
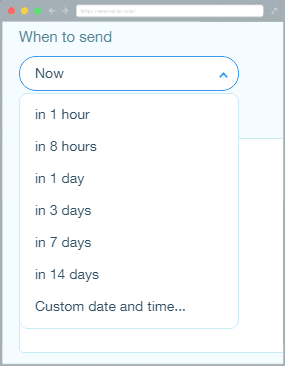
Another thing that can be planned beforehand is the schedule for when the invitation will be sent. Just set up the exact date and time of when you wish for it to launch. That way, you can take your time to prepare your invitations properly.
Setting up reminders
What you can do next is set up a Reminder. It is useful when you need the invitations to be sent again after a while to everyone who still hasn’t filled out the survey. That is an effective way to increase the final number of completed surveys.
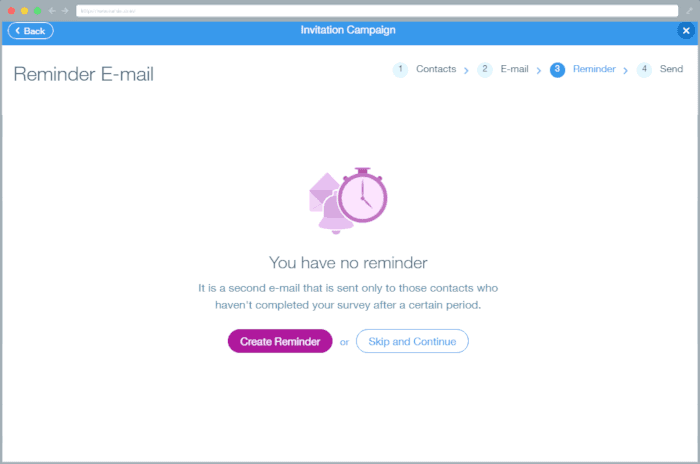
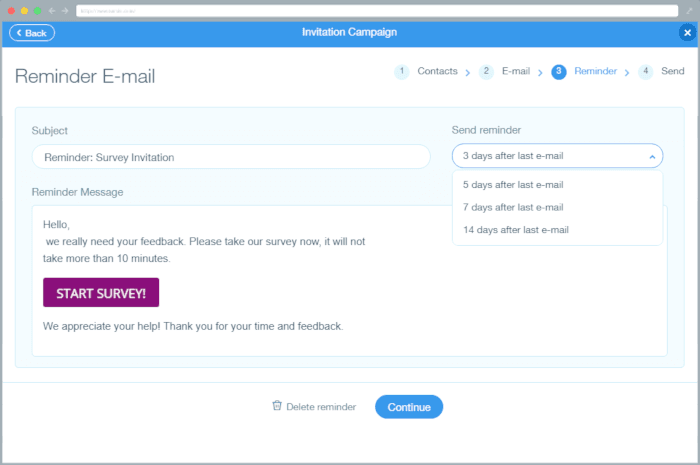
Click on the “Create Reminder” button which will get you to the following window. There, you can edit the text of the reminder, in a similar way as in the previous case. You can keep the default text or add more arguments for why to fill out the survey. Make sure not to forget to specify after how long the reminder should be sent again to those who haven’t completed your survey yet.
Finally, you will get well-arranged, summary information about how your invitation was set up.
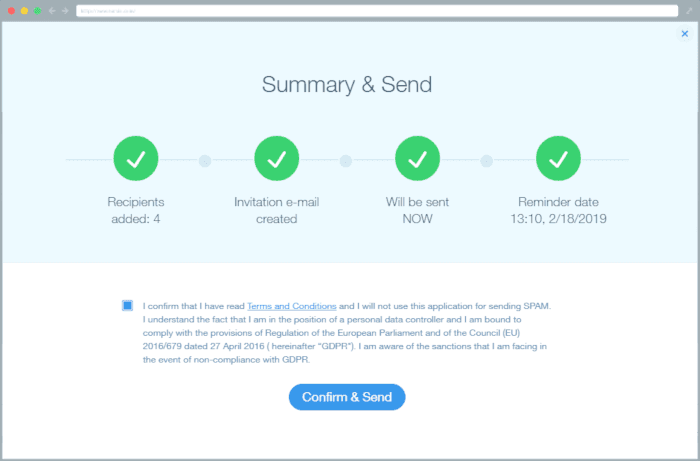
Click the “Confirm & Send” button to send the invitations. The process of sending out could take a little while, especially if the amount of recipients is large, but at least you can always count on them being sent for sure, unlike regular e-mails.
Evaluate how successful your invitations were
Enter “Settings” again, the same way you did at the beginning. First, click on “Get Responses” and then on “Send Invitations”.
An overview of all your sent invitations will open as you enter the settings. You can, of course, create another one by clicking on “+ New Invitation” (1) and continue the same way as in the above chapters.
We mentioned in the beginning that the main advantage of distributing invitations via Survio is in the possibility of their evaluation.
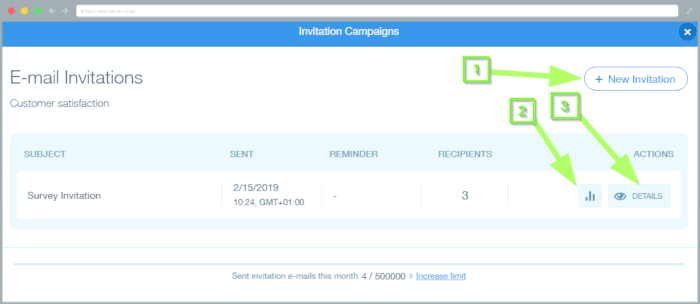
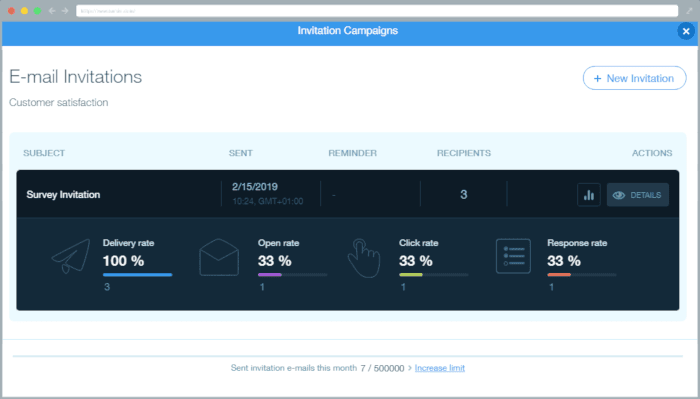
When you click the bar chart icon (2) you will be able to see a few interesting metrics. Both their relative (%) and absolute values are accessible.
- Delivery rate – shows the percentage of respondents the invitation got sent to
- Open rate – determines in percents how many recipients of the invitation e-mail have opened it
- Click rate – tells the percentage of respondents who clicked on the invitation link
- Response rate – possibly the most important metric that will inform you about the percentage of your recipients who actually have completed your survey
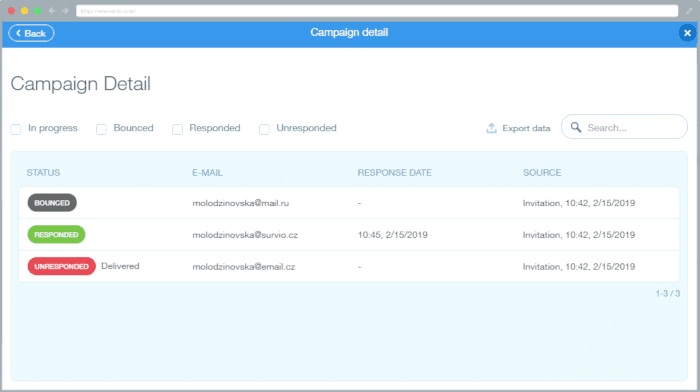
If you click the “Details” button (3) you’ll get to a thorough overview of all users you have approached. There you can review individual information about the delivered invitations and even the date of when your survey was completed and submitted.
This is it! We’ve now gone through all the available alternatives for using the invitations to fill out your survey. Give it a shot and find out how much of your effort can get saved!
Note
Survio’s Distribution service is above-standard because it does a lot of extra work for you (it’s thus costly to operate it) and therefore it is accessible for premium users of BUSINESS and ELITE plans only.
In case you’d like to share any questions, comments or observations with us, please don’t hesitate to contact us on Facebook, Twitter, G+ or via e-mail.
Create your own questionnaire or survey for free
Setting up your first survey is quick and straight forward. Choose from one of 100 predefined templates or create your own from the scratch. Start getting your first responses in 5 minutes.
Create your own survey